| Display
|
Action |
Response |
|
|
Press
MENU
Press ENTER |
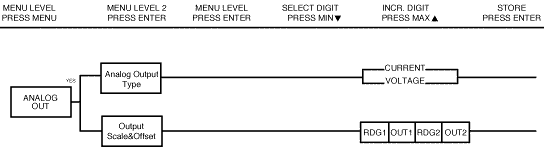
1)
Press MENU, if
necessary, until
the "ANLG 0UT"
prompt appears.
2) Display
advances to "Analog
Type" submenu. |

|
Press
MENU |
IF
THE ANALOG OUTPUT
OPTION IS NOT
INSTALLED, THE
CONTROLLER WILL
SHOW "not InSt"
Press MENU, if
you receive the
"not installed"
message and advance
to the "Communication"
submenu. |
|
|
Press ENTER
Press MAX
Press ENTER
|
ANALOG
TYPE SUBMENU:
3) Display
flashes "volt"
or "curr".
4) Scroll
through the available
selections: Volt
or Current.
5) Display
flashes "stored"
message and advances
to "Reading 1"
of the Output
Reading submenu. |
|
|
Press
ENTER
Press MAX & MIN
Press ENTER |
READING
1
6) Display
flashes 1st digit
of previous Reading
1 value.
7) Enter
"Reading 1" value
8) Display
advances to "Out."
|

|
Press
ENTER
Press MAX & MIN
Press ENTER |
OUT
1
9) Display
flashes 1st digit
of previous Out1
value.
10) Enter
"Out 1" value
11) Display
advances to "Reading
2" |
|
|
Press
ENTER
Press MAX & MIN
Press ENTER |
READING
2
12) Display
flashes 1st digit
of previous Reading
2 value.
13) Enter
"Reading 2" value
14) Display
advances to "Out.2"
|
|
|
Press
ENTER
Press MAX & MIN
Press ENTER |
OUT
2
15) Display
flashes 1st digit
of previous Out
2 value.
16) Enter
"Reading 1" value
17) Display
advances to the
"Communication
Option" menu.
|
| Note:
The above example
is for 0-10 of
the entire range
of the process
input and analog
output. For 0-20mA
output all you
need is to set
OUT2 to 20.00. |
 TOC
TOC
 Back
Back
 Next
Next